|
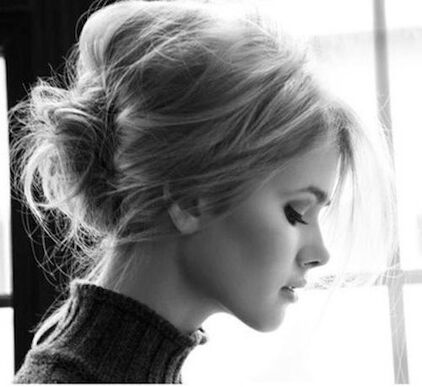
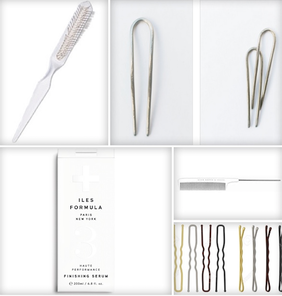
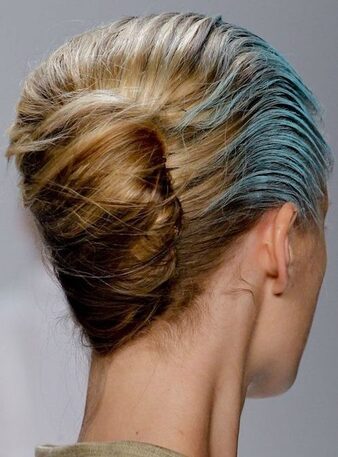
It’s almost the end of the year… A wonderful festive time filled with love and warmth. Even though most of us will be under home confinement this New Years’, that doesn’t mean we shouldn’t dress up and look as stunning as we would going out. To serve you, we have curated a step by step ‘How To’ guide for the Classic French Roll. With New Year’s Eve celebrations on our doorstep, it’s a good and easy recipe to know. We love delivering styles classic enough for your mother, and stylish enough for you. It is truly a classic style that never goes out of date, perfect for all ages too! This week, in preparation for the new year, Iles Formula’s journal shares with you the Iles Formula’s Hair Ideas: A Perfect Guide to Modern French Roll Hairstyle For New Year’s Eve because it is the perfect “go-to” hairstyle for any woman of any age. What You Will Need
Step By Step
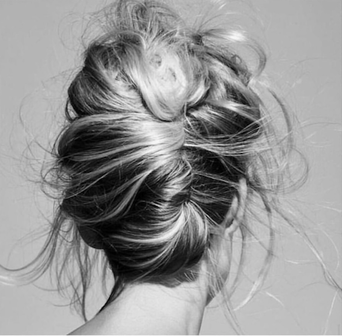
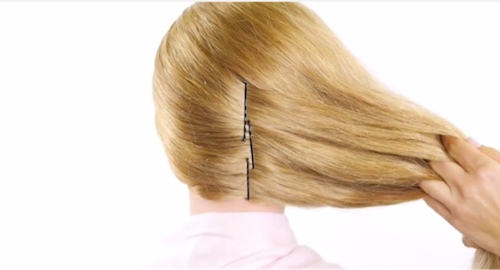
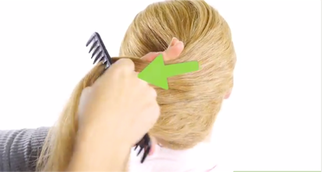
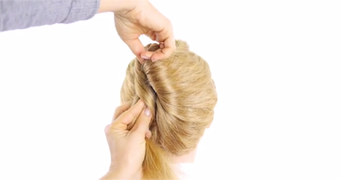
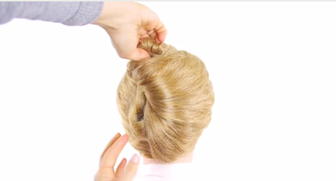
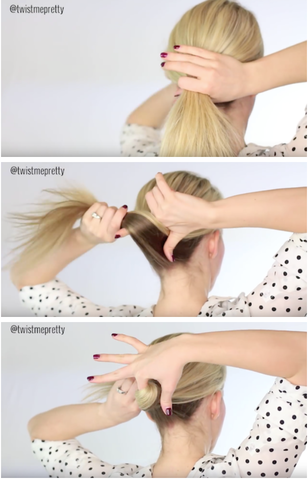
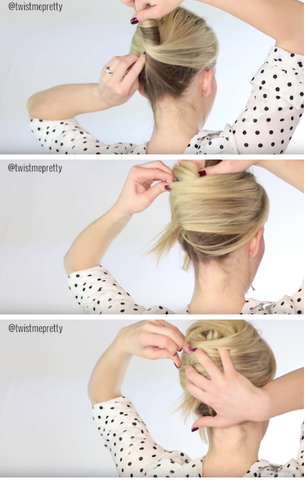
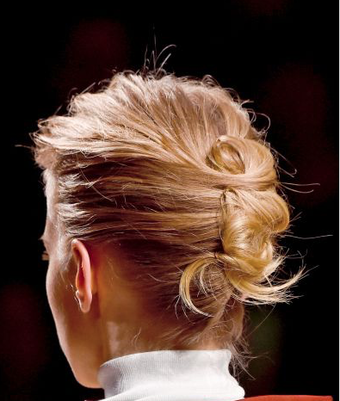
Classic French Roll Hair by Kyle David Malone 1. For the classic variation of the French Roll, follow these steps below – extracted from wikihow.com 2. Begin by directing your hair to one side and securing it with bobby pins the way they are stacked in this image. 3. Next, hold the hair in the palm of your hand and begin to twist the hair up towards the top of your head. Twist the hair tight so that it is secure. Once the hair is twisted tight it will coil and form the roll. 4. Depending on the length of your hair, you may have long ends that are left beyond the twisting. If this is the case with your hair, simply fold those ends down and tuck them underneath the roll. 5. Once you have tucked the ends, you can take some hairpins and use them to secure the roll into place. To secure tightly, take the hairpin and place it horizontally on the edge of the roll. Place the ends of the hairpin through the roll towards the left ear, and then rotate the pins back in the direction of the right ear. This will secure the roll tightly to ensure it stays all night. Use hairspray if you prefer a bit of hold. 6. When you are finished, you can add a bow, broach, some pearls, or an accessory to decorate the hair if you prefer. To see more of our hair accessory inspirations, click HERE. Modern French Roll 1. For the Modern French Roll, the technique is somewhat similar, but it is created a little bit quicker because you just begin by twisting the hair. You do not have to pin the hair first. In addition to that, the hair is more about the texture and less about a smoother finish. Allow bits to drop out and you can even rough it up a bit when you have secured everything into place. Take a peek at the steps below from @twistmepretty. Whether you are going for the classic roll or the modern roll, you can detail and finish your hair to your preference. See another version below for shorter hair length where there is no length to roll. This super glamorous style will work with jeans and a blazer or a nice cocktail dress so it’s a very versatile option for your hair.
0 Comments
According to stylists, short hair is making a comeback for spring! IGK Co-Founder Aaron Grenia and R+Co Director of Content Adam Federico are both predicting shorter styles will be a trend this season. While colorist and R+Co Collective Member Richy Kandasamy is predicting cinnamon brown and low-maintenance shades to continue into 2021. See below for their insight and inspiration images they’re looking to this year.  The Very Short Bob “I think we’re going to see a lot of short hairstyles, especially very short bobs – under the ears. Something like you see on Mathilda in the movie Léon. I love this look because it has the most effortless cool factor.” – Aaron Grenia  The Shift “Specifically, for spring 2021, we’re forecasting a shorter hair comeback. I like to think that the trend will be shorter hair with longer, disconnected lengths through the top including varying lengths and textures. I like to call this haircut the Shift as its ability to have versatile styling options, from something edgy and raw, to extremely polished and sophisticated. The idea with this is that the haircut can be finished to suit the individual’s personality and meet them for who they are within that day. This is a haircut we are also pushing through R+Co again, forecasting trends and the future.” – Adam Federico  Cinnamon Brown & Low-Maintenance Shades “I predict that we are going see a lot of sandy and cinnamon browns, and overall, more naturals and low-maintenance shades. We are seeing clients coming in with 6-7 months’ worth of regrowth and the clients want to work with their natural hair. For a lot of clients, this has been a positive reset and they want to embrace their natural hair color or stay as close to their natural color as possible.” – Richy Kandasamy This is from ModernSalon
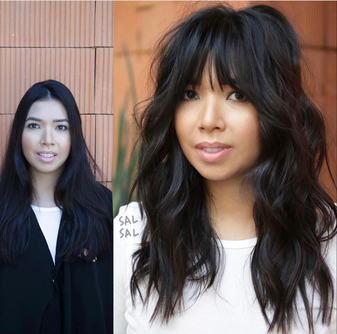
If you know someone (maybe even yourself!) who has been dreaming of making a dramatic hair change without sacrificing a ton of length, then curtain bangs may be the answer. The elegant, flowing layers beautifully frame the face, and can go with almost any length. 1. Beachy Curtain Bangs This style is as loose and carefree as a day spent at the seaside. Here, Peter Thomsen (@pjthomsen) gave his client a light new balayage and soft face-framing layers. 2. Delicate Curtain Bangs Sometimes less is more, even when your client has long hair, as demonstrated by Chris Weber Mirlach (@chrisweberhair), who describes the bangs as "effortless." 3. Curtain Bangs with Style Curtain bangs don't just look good when the hair is down--they can really add to the style when the hair is pulled up into a stylish updo or carefree pony, as shown by Rachel Williams (@rachelwstylist). 4. Bardot Bangs Curtain bangs can add drama and depth to a sleek style, as shown by Sal Salcedo (@salsalhair), who calls these "Bardot Bangs." 5. Romantic Shag Curtain fringe can add volume and natural wave to the hair, giving it a romantic, old world feel, as shown by the work of Lo Shabino (@classiclois_hairstylist). 6. French Fringe Paige Bureck (@pinkdagger) gave her client some decidedly French feeling with this cute cut. 7. Fuller Fringe Done correctly, a shag and curtain bangs can actually give the illusion of thicker, fuller hair, as seen on Holly Seidel's (@hollygirldoeshair) client. 8. Bold Color, Bold Fringe Sometimes a client wants a complete transformation. And while this style from @mageofhair doesn't require lots of length to be lost, it certainly makes an impact—and one that's only enhanced with a bold color choice. 9. Long Fringe, Short Hair Belinda Mills (@bel_pipsqueekinsaigon) shows that short-haired girls can wear curtain bangs, too! 10. Farrah Fawcett Fringe Mick Lewis (@hairbymickk) created this look that harkens back to the '70s when shags reigned supreme—but with a thoroughly modern twist. 11. Voluminous Curtain Bangs Go big or go home! Curtain bangs don't have to be subtle, they can be in-your-face, like this gorgeous cut from Brian Hickman (@brianhickman1)
These fun looks are at Beauty Launch Pad Despite the effortless look messy bun hairstyles give, creating a decent messy bun to go out anywhere outside your kitchen or bedroom is not that easy. More so if you have fine, straight, middle length hair. In The Right Hairstyles, we believe that no hair mission is impossible; this is why we have prepared a step-by-step messy bun tutorial that will teach you how to put your hair in a bun with minimal effort and head-turning results. If you are lucky to have long, full hair, give a closer look at the third way: unlike other common ways to make a messy bun with thick hair, this one allows creating a more intricate and elegant updo. Watch the video tutorial and scroll down for the list of steps and even more hacks and methods! How to Do a Messy Bun for Thin Hair 3 Easy Messy Bun Tutorials How to Do a Messy Bun with Thin Hair The truth is, when you have short, thin hair, you always need some kind of a hack to make a messy bun look good. Otherwise, the bun will be really tiny, which means two things:
Thankfully, we know three hacks that will help you create a voluminous messy bun for thin hair. #1: Cute Messy Bun for Thin Hair  This method will help you create a messy bun with middle-length hair and even a short lob haircut. Here are the steps to follow: Step 1: Brush your hair, pull it into a high ponytail, and secure tightly with an elastic. Wrap an elastic tie several times to raise the ponytail and set it away from your head. Step 2: Pull hair to the front to avoid a smooth ponytail look. For a messy bun, the whole hairstyle should look a bit messy, not only the bun itself. Step 3: Tease your ponytail thoroughly (refer to this teasing guide if need to). Don’t be too hush, as thin hair is prone to damage. If your hair is clean and lacks grease, spray it with dry shampoo for a better grip. You will soon end up with a messy and fluffy ponytail like this: Step 4: Now, grab sections of your teased hair and pin it to the base. You do not need to create additional twists or knots. The idea is to get the teased hair pinned at all sides to recreate the form of a bun. You may not hide the tips, as they complement the ‘do very well. Step 5: Pull out the front pieces. If you have some baby hair, do not smooth it up with hair gel – it is ok to let it fall on your face too. If your hair is too short at the back and cannot be pulled into a ponytail, you may simply clip it with a bobby pin. #2: Huge Messy Bun with a Donut Bun Maker  Using a donut bun maker might be the easiest way to put thin hair into a bun. The problem is that such buns end up to be slick and smooth ballerina buns – not a hairstyle we aim for here. So, here is what we suggest doing instead: Step 1: Brush your hair and tie a high ponytail at the top of your head. Step 2: Pull hair to all sides so that it doesn’t look too smooth. Step 3: Take a bun maker for your hair color. Find a string that holds a bun maker in its form; this will allow you to unwrap it. Basically, this is the reverse of what you do with your sock making a sock bun. Thus, wrap the unrolled bun maker around the base of your ponytail and secure it with bobby pins. Step 4: Lay the strands of your hair evenly at all sides. Here is how it looks like: Step 5: Start pinning the strands to the base. It is better to pin them as they are, without twisting, as you might end up lacking hair to cover some of the areas. Again, leaving the tips visible and pulling your front pieces will only perfect the look. #3: Messy Bun for Short Hair with Hair Extensions  Another way to create an intricate huge messy bun hairstyle entails using hair extensions. Do not worry, you don’t need any permanent hair extensions here. More than that, even the cheapest clip-ins will do (these are the ones we have used in the video to be sure of what we say). If you go for cheaper extensions, spray them with some dry shampoo to get rid of excessive smoothness. This simple hack will make styling a messy bun much easier. Step 1: Brush your hair extensions through and unclip the base to be ready to clip it. Step 2: Section your hair near the temples. Place the upper section on top of your head so that it doesn’t tangle with your extensions. Then, clip in the extensions to the lower section. If you have smooth, straight hair, tease the roots a bit so that the extensions clip better. Step 3: Lay down the upper section of your hair and brush it through together with the extensions. Then, pull your hair up into a high ponytail. Leave the hair a bit loose or drag it to the front when the ponytail is tied. Step 4: Separate the ponytail into two strands. Then, again, split each strand into two and twist them around each other (you may try twisting the stands as they are, without sectioning into two parts, but this step gives a bit more control over your hair). Then, twist two parts of the ponytail around each other. The twists make colors blend perfectly, so even if your extensions didn’t match your hair color very well, the bun can turn out to be even more beautiful, with some great highlights and lowlights. Step 5: Tug and pull on the sections to make them fluffier; then, wrap the twisted ponytail around the base of your pony. Secure the messy bun with bobby pins and spray some hairspray for a better hold. How to Do a Messy Bun with Long or Thick Hair If you have long, thick hair, messy buns will be less of a challenge. The classical method is to twist your ponytail and wrap it around itself, securing it with a few bobby pins. Key ingredients to add to the hairstyle are making the hair looser by pulling it after the ponytail is tied (or even after the bun is ready), as well as pulling and styling some front pieces. If the classical method doesn’t work for you and you struggle to make the messy bun stay in place, here are the 3 ways to modify it. Experiment with each way to see which one gives you the most finished yet elegant and effortless look.
Ready to show off your messy bun? from The Right Hairstyles
1/15/2021 0 Comments How red hair is different to other hair shades, and not just because of its colourFrom just a passing glance, it’s obvious that red hair differs from other shades. It’s eye-catching, multi-tonal, and has an ability to command attention.
But other than its striking colour, red hair is different to other hair colours in many other ways. Red hair is more fragile, and in shorter supply Natural ginger hair strands are much more fragile than other hair types. And, while many redheads believe they have lots of hair, in general they technically have fewer strands. In fact, it’s estimated that natural blondes have 110,000 strands on average, brunettes have 140,000, while redheads only have 90,000 strands on their heads in total. These fewer strands are usually thicker for redheads though, so the appearance can sometimes be that gingers actually look like they have more hair than other colours. As you can imagine, this combination of fragility and thickness makes for a somewhat tricky customer. Ginger hair is prone to frizz and coarseness Due to the fragility and thickness of red hair strands, this often makes for coarseness and frizz aplenty, which in turn can actually make your ginger shade appear duller than it should. If you think about it, the frizz stands in the way of allowing light to reflect more easily off your hair, so it’s difficult to achieve shiny, bright red hair. By encouraging smoothness of the follicles and strands, more light can then reflect off it, giving brighter, shinier red hair that reveals the multi-tones of your ginger shade. Dryness is the enemy With the above issues of frizz and fragility, many redheads turn to heat styling to try to combat the coarseness and to impose some smoothness on their ginger locks. While heat styling is a temporary solution to reducing frizz, and indeed does smoothen the strands, what happens is it makes your red hair drier and drier each time. Everyone knows that excessive heat styling is bad for their hair, but for redheads, having already fragile and frizz-prone strands means this is a sure-fire way to cause breakage and split ends. Moisture is your friend What red hair craves is heaps of moisture to help encourage strength and smoothness in its follicles and strands. But don’t mistake ‘moisture’ for ‘silicones’. Found in the majority of hair products, silicones are an artificial way of pumping something that appears to give smoothness and moisture to your hair. Granted, for a time your hair may become shinier and feel more conditioned, but over time it will become accustomed to these silicones, which can cause product build-up and eventual dullness, too. The reason why silicones are so prevalent in haircare is because they’re often teamed up with sulfates, the foaming agent commonly used in shampoos and soaps. They’re bad news for the hair and scalp in general, and in particular for redheads, as they’re extremely drying, stripping your natural, glossy oils from your scalp and strands. The answer? What we’re faced with here is red hair that is crying out for something to combat its frizz, fragility, coarseness and dryness. By cutting out both sulfates and silicones, either by going cold turkey or through gradual use, you can train your red hair to rely less on artificial ingredients. Instead, use ingredients that enhance red hair and help alleviate its weaknesses, injecting more shine, moisture and vibrancy into it. Oh, and kick your heat styling habit, too. |
Hair by BrianMy name is Brian and I help people confidently take on the world. CategoriesAll Advice Announcement Awards Balayage Barbering Beach Waves Beauty News Book Now Brazilian Treatment Clients Cool Facts COVID 19 Health COVID 19 Update Curlies EGift Card Films Follically Challenged Gossip Grooming Hair Care Haircolor Haircut Hair Facts Hair History Hair Loss Hair Styling Hair Tips Hair Tools Health Health And Safety Healthy Hair Highlights Holidays Humor Mens Hair Men's Long Hair Newsletter Ombre Policies Procedures Press Release Previous Blog Privacy Policy Product Knowledge Product Reviews Promotions Read Your Labels Recommendations Reviews Scalp Health Science Services Smoothing Treatments Social Media Summer Hair Tips Textured Hair Thinning Hair Travel Tips Trending Wellness Womens Hair Archives
April 2025
|
|
Hey...
Your Mom Called! Book today! |
Sunday: 11am-5pm
Monday: 11am-6pm Tuesday: 10am - 6pm Wednesday: 10am - 6pm Thursday: By Appointment Friday: By Appointment Saturday: By Appointment |






 RSS Feed